
I’ve sworn that I’m going to get my “to-do” pile in the sewing room this summer. It’s not quite a UFO pile…it kind of has it’s own classification. It’s all the silly things that are either super fast projects or just need fixed!
Anyway, today I set out to wrap up some things outside but I woke up to a yucky rainy day. So, off to Joann’s we went! I grabbed some 3″ foam, my 50% off coupon and I was determined to get this bench cushion out of my to-do bin! I figured that I would help you while I was at it; with this helpful tutorial, you’ll be able to make any sized bench cushion that you need! Follow my formulas and it’ll fit snuggly and look lovely! Let’s get started:
This page contains affiliate links. As an Amazon Associate, I earn a small commission from qualifying purchases. This helps support the free content I provide, at no additional cost to you. Thank you!
What You’ll Need
- Foam of any thickness (I used 3″ thick foam)
- Sharpie Marker
- Electric Carving Knife
- Sewing Machine
- Fabric
- Matching Thread
- Rotary Cutter
- Ruler
- Self-Healing Mat (optional)
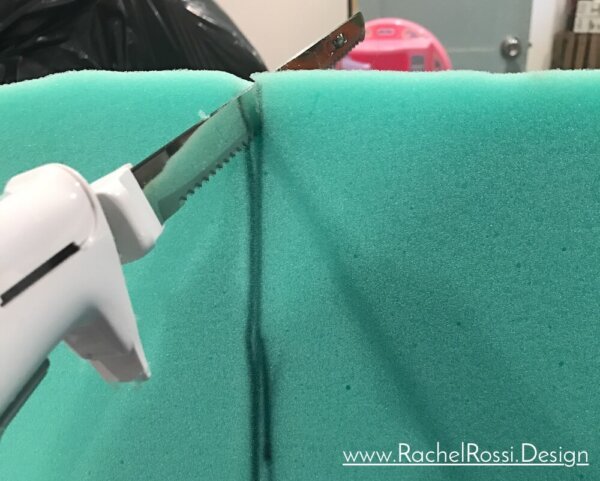
Part 1: Cutting Your Foam to the Right Size
To get started, you’ll need to measure out how much foam you’ll need. Once you have your dimensions, draw your cutting lines onto your foam with a sharpie marker. You’ll need something to help make a straight line: an acrylic ruler, yardstick—even a piece of wood would be helpful here.

Now it’s time to cut your foam. I suggest doing a little test run on a corner or scrap piece of foam. It’s pretty simple, but I just want you to get the feel of it before you start cutting.

Simply turn on your electric turkey knife, and start gliding through the foam, I really enjoy this part! It’s amazing how well it cuts.
Now that you’ve cut your shape out, make sure that all your measurements are correct and try it on for size. Now is the time to make any adjustments you need!

Part 2: How to Make Any-Sized Cushion Cover
Now onto the really helpful part: how to make a custom sized cushion for your bench, chair, or whatever! It’s relatively simple, let me show you:
Step #1: Measure Carefully
First, measure out your dimensions. I like to draw a little diagram to make my life easier. We’ll assign each piece of your cushion a letter so that you can just plug your numbers in:

A: The part of the cushion where you’ll sit
B: The front edge of your cushion
C: The side edge of your cushion
Step #2: Calculating Fabric for your Cushion
We are going to start by calculating how much fabric you need to go around your cushion (from front to back).

First, measure the width of A and the height of B. Multiply them both by 2 and add 1.” The formula looks like this:
(Aw x 2) + (Bh x 2) + 1 = Fabric Width
Write this number down as the width of your fabric. Next, let’s figure out the length:

Measure the length of A and the height of C. Add them together and add 1.” The formula will look like this:
Al + Ch + 1 = Fabric Length
Now you’ve got the two measurements that you’ll need to cut your fabric! I will show you my measurements so that you can see how it all works:
Here are my cushion measurements:

To find the width of my fabric, I plugged in the numbers. Here was my formula:
(16.5 x 2) + (3 x 2) + 1 = 40″
Then, I found the length:
44 + 3 + 1 = 48″
I was finally ready to cut my fabric! I cut a piece that measured 40″ x 48.” If you’re using a directional fabric, be sure to pay careful attention to how the fabric will lay on the cushion before cutting.

Step #3: Sewing Your Cushion
I know that might have seemed like a lot, but this is actually a really quick project since I’ve taken all the guesswork out for you! Once you get sewing, you’ll be done before you know it.
Note: all seams are 1/2″ unless noted otherwise! I suggest that you use a serger or finish your edges with a zigzag stitch if you’re using a fabric that frays easily.

First, fold your fabric in half, match your long sides, right sides together. Stitch along one short side, the long side, and about 3″ of the remaining short side. Leave a large opening on one end of the cushion. Sew about 3″ out from the remaining open corner (see image below).

To create a boxed corner, pull the two sides of the cushion apart from each other, near the corner. Pinch the corner together, matching side and back seams until you feel the seams to match up. Flatten on a hard surface, measure across the corner and mark whatever the height of C was in your diagram (for me, this was 3). Pin and sew across the line that you drew. Trim to ½” seam (Image below) and repeat on the other 3 corners.

Step #4: Finishing Your Custom Cushion Cover
We are almost there! Now it’s just time to stuff this thing! I had a much easier time than I anticipated because I was using an outdoor fabric. The treatment on it makes it somewhat slick and the foam glided right inside. There was still a little wrestling involved, but it was minimal.
I started by folding my foam in half, lengthwise and sitting on it (I wish this was a Youtube video for your entertainment!). I then carefully slid the cover over the foam, making sure not to bust any stitches as I went.

After a little bit of finagling, you should have a perfectly fitted cushion! You can choose to hand stitch the opening closed or, if you lack a certain level of paitence for these sorts of projects, you can use a teeny tiny zigzag stitch on your machine to finish the job!

Now it’s time to plop that cushion where it goes and enjoy the view!

This is the beginings of my shade garden out back…it’s a work in progress.

Look how snug! And you don’t even have a seam in the front!

Now me and my daughter can sit under our tree and enjoy our little garden.
I hope that was a helpful tutorial for you! I know that there’s all sorts of intimidating measurements and cuts, so I hope I’ve taken some of the stress of this project out of it for you. Happy sewing! I’d love to see your success or answer your questions on Facebook or in the comments below.
Enjoy reading this post? To make sure you don’t miss a thing, follow me on Pinterest, Facebook, and Instagram and sign up for an email subscription to my blog.

Wonderful information. Hoping to try this on a patio bench first, than will hopefully try my sunroom couch. 🤗 Thank you for all the wonderful information.
That sounds like a good plan- I can’t wait to see it all finished!
Amazing directions!! So easy to follow and came out so nice!! Thanks!!!
Thanks so much Diane, I’m glad to hear it 🙂
That is a fantastic tutorial! Now I can make my own cushions. My husband was happy to find another use for the Thanksgiving turkey knife.
That’s great! I’m glad to hear it, make sure to share your success with me on Facebook! 🙂
Thank you so much for your design. It helped me make cushions for our grandson’s wagon that my husband made. They turned out perfect. My husband said that I would be hard pressed to convince someone that they weren’t made professionally.
Yay! That’s what I like to hear!
Thanks for the info it seems very clear instructions, can’t wait to try it out. Are you on UTUBE as I learn quite a lot of tutorials from there, but never seen this one before. Stay safe, Jean.
Hi Jean,
Thanks so much for your kind words. I am just getting started on YouTube, but I haven’t posted this as a video yet, that’s a great idea!
Thank you so much for this. I’ve been making these covers this afternoon. You’re right you’ve done the hard work on the math. Once I sorted my seam allowance and checked my working out it’s a piece of cake! First one I’d been a little generous so the cover didn’t fit snugly. All sorted and so pleased with them. So sew easy. 😊🌻
I’m so glad to hear it Linda! Enjoy 🙂
When you figure the length aren’t we supposed to take into account both ends? If the length is 44” + 3” (for the end) +1” your total is 48”. Where you you get the extra 3” for the height of the other end?
Great question BJ! Actually, the formula is correct as-is. If you scroll down and see how the fabric is folded, you’ll only need 1.5″ on each side because the other 1.5″ is coming from the other side of the fold…I hope that makes sense, it’s really difficult to explain without physically showing you.
Absolutely! I just wasn’t figuring correctly. I am looking at putting a zipper in one end of the cushion. Have you done that with this pattern?
I would also love to know this! I’m a novice sewer, and my brother requested a cushion with a removable cover. Ack!
No worries Jen! You can insert the zipper into the seam allowance pretty easily. I don’t have a tutorial up for it yet, but would like to cover zippers soon. For now, check out this tutorial on center seam zippers: https://blog.treasurie.com/how-to-sew-a-zipper/
I haven’t done that with this pattern before, but depending on the type of zipper, you should be able to insert it into the seam allowance without adding anything to the dimensions.
Thanks so much for this. I bought a piece of foam to make a cushion for my grandkids’ little reading nook and had no idea how to start. Watched other videos but yours was most straight forward. They are thrilled with it. 😊
That’s great to hear Barbra! I’m so glad it worked well for you 🙂 I hope they enjoy it.
I did my fire pit bench pad with your tuto and it’s brilliant !!!
Now trying to do my table benches pads but I’m stuck as there is an angle in my foam and the results is not nice, any idea how I can go over this ?
That’s great to hear Alexandra! I’m so glad it was a success!
If your foam isn’t straight, you’re not going to get that nice clean edge. You can buy another (small) piece of foam and butt it up against the angle, (temporarily) tape, and then cut to the length you need.
Good luck!
Great instructors, but I am stuck I don’t understand how you did the box corners. After you stitched all around, minus the opening. Pulling the fabric.
Help!
Email Bogee4me1@gmail.com.
Thanks in advance
To create a boxed corner, it’s important to remember that you’re going from a flat project to something 3 dimensional. To get started, take one corner and open it up so that the side seams match up (these would be the two seams that make the 90 degree angle as it’s laying flat). It should look like a little triangle in your hands. Flatten on a hard surface, and measure across the corner and mark whatever the height of C was in your diagram (for me, this was 3). Pin and sew across the line that you drew. Trim seam down to ½”.
I’m hoping that this is helpful for you. Make sure to take a look at the diagram on the blog post as well. Pictures seem to make things so much easier when explaining!
I pinned this a couple weeks ago and I’m so glad I did! I went to JoAnn’s today and saw all their outdoor fabric was 60% off. I hadn’t figured out the dimensions yet but I knew my cushion size, so I was happy to see your simple instructions and helpful diagrams. There was just enough on one bolt to make the covers I need, and I bought a second fabric option since it was on sale. Thank you!
It’s just wonderful when those sorts of things happen! Have fun! 🙂