


Isn’t it a relief that some things in life that intimidate us most are actually the easiest once you try?
Piping is one of those things that seems to be frightening, but is so friendly once you get to know it!
Today I’ve got an up close and personal tutorial on how piping works and how you can master it!
The Right Shoes (or Feet) for the Job
You wouldn’t show up for work on a construction site in pumps…would you? In the same way, you want to make sure that you have the right feet for sewing on piping. You can use a zipper foot if you’d like, but this is one of those cases where I think the right tools make all the difference. You can check out my post on BERNINA Sewing Machine feet for piping if you’d like to get into the nitty gritty.

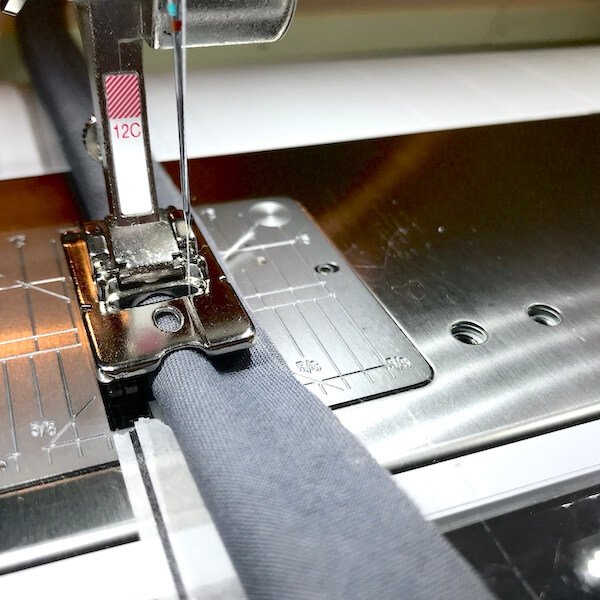
Making Piping
Piping is actually pretty simple to make. But first, you need to know how to cut bias strips (see the tutorial here!)
Now it’s time to set up your machine! If you’re using a piping foot, this can go a couple different ways, but essentially, you want the needle running NEXT to the piping, not on it and not too terribly far away.
For the majority of piping feet, this means that you’ll want to place your needle fully to the right.
Once you’ve made and pieced your bias strips, and set up your machine, you’ll want to insert your piping. Simply run your piping cord down the center of your bias strips, and fold the fabric around it, wrong sides together.

Place the piping onto your sewing machine, set into the piping foot with the piping on the left side and the raw edges on the right. Do a straight stitch down the side.
Now, you’re going to take one of the fabrics that will make up this piping sandwich and place the piping along the raw edge, on the RIGHT side. Keeping raw edges matched, you’ll want to run both pieces of fabric under the piping foot again (with all the same settings) to hold it in place. You can use a basting stitch here—nothing crazy. So it should look like this, where there are two sets of stitches on top of each other.

Then you’ll add the top of your piping sandwich, matching raw edges. Carefully turn the whole project over so that you can see the basting stitches you just created.

Move your needle over 1-2 places and I set my stitch to something nice and strong, like 2.5mm.
Now you’ll sew just as before, making sure to keep raw edges aligned and the piping running through the foot. This will keep everything nice and straight!

Finishing
There are lots of different ways to finish piping, and if you’re using a pattern, it’ll probably have a certain way for you to do it. That said, I do have a favorite method. You can check it out here!

Want to Learn More about Piping?
I’ve got lots of great posts all about piping—Make sure to read them all: