


Today is the day (or this week is the week!) – we finally get to sew this top and see it in it’s full glory!

There’s a few special things to keep in mind, especially if you’re using ombre or gradient fabrics, so make sure you read all the way to the end. There’s also a prize coming up, so you’ll really want to make sure you read this whole post through so that you can be eligible to win!
Last week we stitched our little ovals off to create the curves for our quilt tops. This week, we get to stitch all those strips together and get the rows into place.
Creating Rows
Following your instructions, lay out your quilt and stitch the strips together to create rows. I liked this part because rearranging is easy here if you stick to moving blocks around within each row.

Stitching Rows Together
Now that it’s time to stitch all those rows together, keep in mind that you’re going to need to pay careful attention to your seam allowance. For those of us using gradients, (if you followed my advice during week 1) keep in mind that you’ll need a wider seam allowance to create the illusion within your quilt top. I ended up just doing a generous 1/4″ seam, but yours might vary slightly.
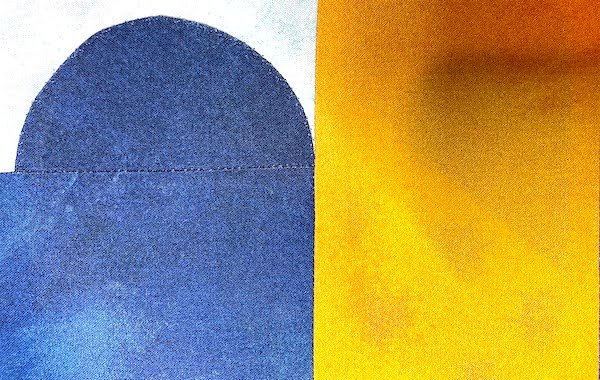
This is easy to figure out: just start sewing two strips together. Take a peek once you get past a curved area. If there’s a flat area showing, then your seam allowance needs to be wider. If it looks cut off, then your seam allowance needs to be smaller. Check out this photo for what you want your seam to look like:
DO NOT SKIP THIS!
This part is really important, please don’t miss it. If this quilt is going to be for anything but display, you need to soak it BEFORE quilting it. It sounds annoying, but really isn’t that big of a deal. The reason I say this is that it’s easier to get the Wash-N-Gone out now, rather than later.

This is something I discovered post- pattern release and have noted on the pattern corrections page. But a lot of people don’t know to looks for pattern corrections, so I wanted to highlight it here.
All you need to do is give your piece a good soak (for about an hour) in lukewarm water. About a half hour in, give each of the half-ovals a good rub until you can’t feel any goo in-between the fabric layers. Soak another half hour to make sure everything is dissolved well.
Then, just hang to dry! I also realized that if you hang it so the seams are pointing down, your ironing session will go a lot easier.

That’s it! Your top is ready for the icing on the cake! But wait…
This is NOT the End!
Now, my dear sew-alongers. It’s been really fun, but finishing the quilt top is not the end of the journey! My quilt is patiently waiting her turn at Cindy’s (my awesome longarmer). Don’t let your quilt top sit in your “to be quilted” box.
If you’re rolling your eyes at me, let me see if I can sweeten the deal! The first quilter to post a FINISHED image of their quilt on Facebook, Instagram (tag me so that I see it!), or by email will win this little cutie; the Creative Curves OttLite.
Finished means quilted (three layers), bound, and labeled! I need images of all these things to prove you’ve finished and declare you the winner!

It’s been a real blast you guys! I hope you’ll post images of your final quilts and tag me when you’re all done. Even if you’re not first. Finished is finished in my book and I can’t wait to see what you came up with!
I’ll be letting you know when my quilt is officially finished and sharing images, of course. Share the love!