


It’s feeling like a DIY day! Today we are going to look at how to recreate this awesome wall, created by yours truly for another volunteer classroom project at my church! We wanted to go with a really industrial feel for the high schoolers’ space…keeping it gender neutral and visually interesting. It’s really quite simple once you know the process, so here we go!

What You’ll Need
- Distressed wood planks
- Dark screws (or steel cut masonry nails for an even more distressed look!)
- 4×4 beam
- 1×4 beams (1 for every 4 feet of wall space to be covered)
- Lacquer or your favorite sealer
Find Some Amazing Pieces
This is the true key to a beautiful wall. There’s lots of people who tear down old barns and other buildings and then sell the wood planks. You can find them on Craigslist, eBay, newspapers…wherever. Just be sure to find a few pieces that will stick out and look great! We found all of these planks behind a shed on our property.
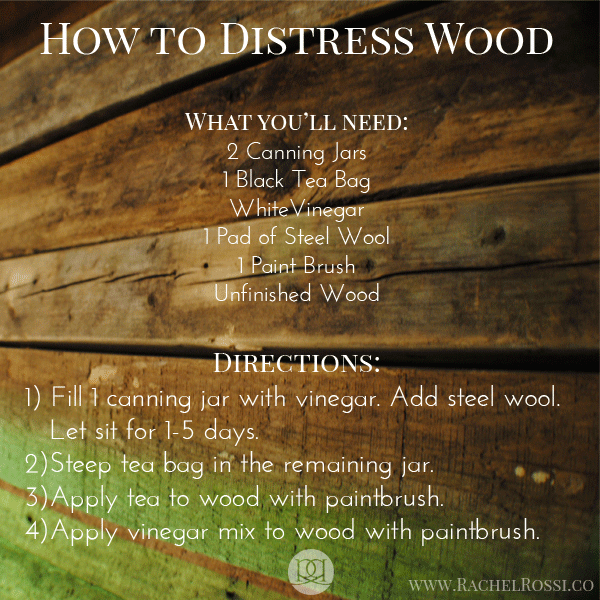
What? You don’t have distressed wood just lying around waiting to be turned into something beautiful? Hmmm…here’s a really great way to distress new wood and make it look old. I used this tea and vinegar solution and it worked like a charm!

This is our standout piece: it has plugs for 5 lights on it…what a great find!
Clean, Clean, Clean
Amazing pieces are usually hidden under several layers of nasty…be sure to scrub away any dust, mold, or whatever you may find before installing. If the boards are truly nasty, coat them with a thin layer of lacquer or other sealer.
Lay It Out
This is the BEST part of the whole thing! You get to spend hours and hours arranging and rearranging the pieces to (1) measure to the right size and (2) get a visually pleasing flow. This took me forever, but I love the whole process…enjoy!
Installation Time!
This part is pretty exciting too! It’s 3 easy steps:
1) If you’re not installing in a corner like I did, skip this step. Measure a 4×4 beam to the height of your plank wall. Fit into corner and screw in place (you can also glue if you’re working with a cement wall like we were).
2) Measure 1×4″ beams to the height of your plank wall. I would suggest 1 for every 4 feet of plank wall. Make sure that you keep in mind any variation in shape or size. You’d hate for the support beams to show between your cool old beams. Screw or glue the beams into place.
3) Take the planks and install 1 at a time, starting at the bottom. Use dark screws, since they tend to blend right in with the distressed wood.
That’s it! I know—a lot easier than you would think! Enjoy your plank wall and if you have any questions about the process, be sure to leave a comment below. I would love to see your finished project on my Facebook page!
Enjoy reading this post? To make sure you don’t miss a thing, follow me on Pinterest, Facebook, and Instagram and sign up for an email subscription to my blog.