Last week I showed you how to make Half Square Triangles (HST) fast, using the Magic 8 Method. Today, we’ll add to that with a full tutorial on how to get pinwheel quilt blocks that are nice and flat.
It’s important to get your pinwheel seams as flat as possible so that when quilting you don’t run into bulky seams that could distort the quilting, break the thread, or even damage the needle. Longarmers are probably jumping for joy upon reading this post! So, go ahead, impress your longarmer with your fancy pinwheel seams…
Let’s get started!
Step #1: Getting Matching Points on Pinwheel Blocks
Alright, so you’ve got your Half Square Triangles sewn, pressed, and trimmed—no problem! Now it’s time to create your pinwheel blocks.
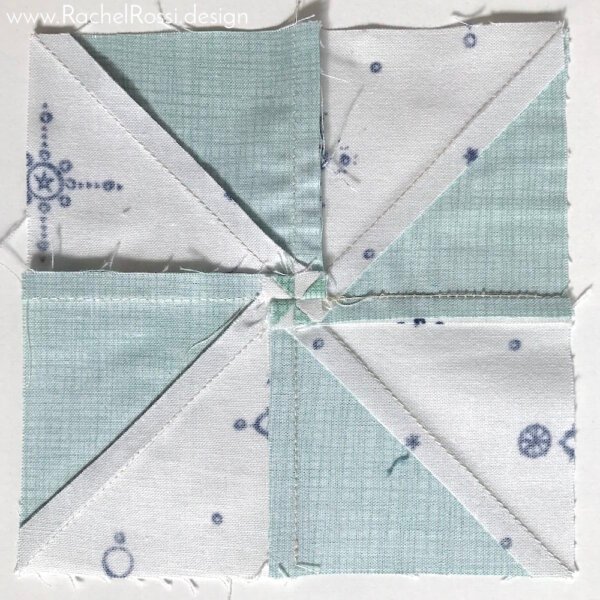
First, lay out four Half Square Triangles (HSTs) to form pinwheels, as shown below. Make sure that your triangles are pointing in the correct direction.
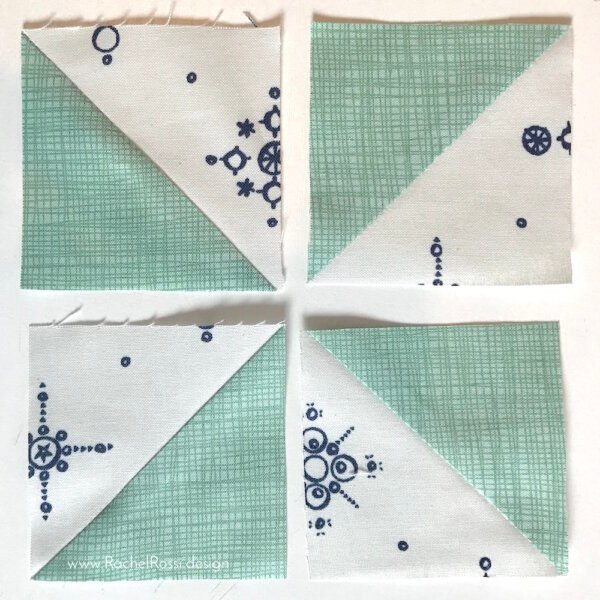
Sew together two top and two bottom HSTs. If you followed my Magic 8 tutorial, you’ll already have your seams pressed away from the background fabric. This will allow you to butt the two diagonal seams right up against each other. Then you’ll have perfectly matched blocks.
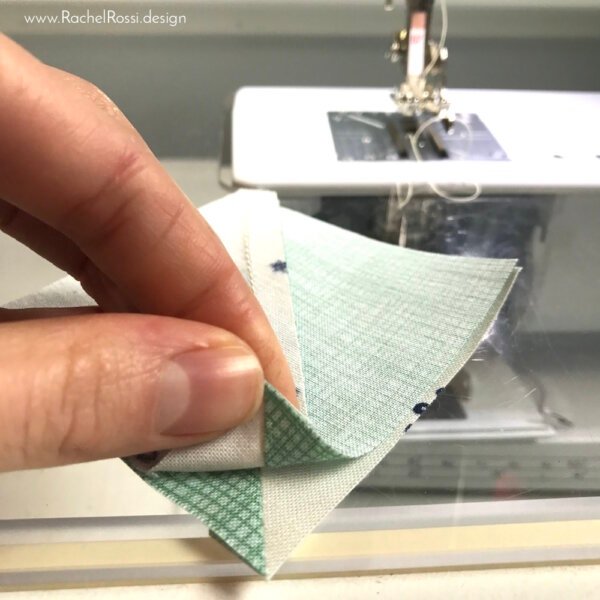
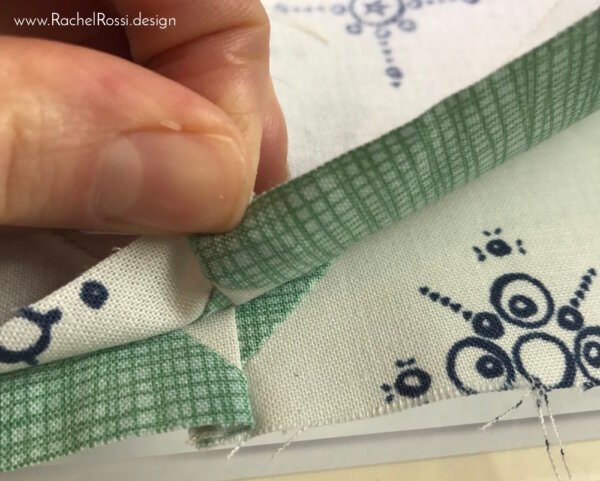
Step #2: Reducing Bulk in Pinwheel Seams
To make sure that your pinwheel seams aren’t too bulky, try this trick! When sewing your two 3″ blocks together (as shown above), leave the top 1/4″ of the set unsewn. In other words, start sewing after the 1/4″ seam as shown at the top right of the image below. You’ll see why in the next step! Press these seams so that all three seams are running in the same direction.


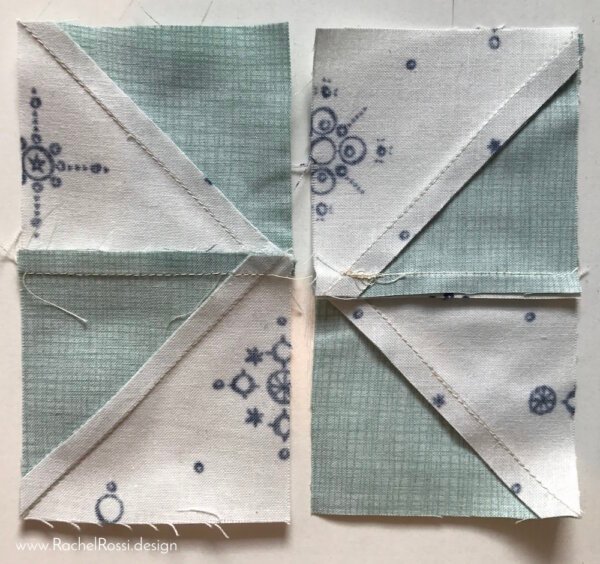
Now, join both halves together along the long edge, butting those seams right up against each other, as before.
Try one of my pinwheel quilt patterns!


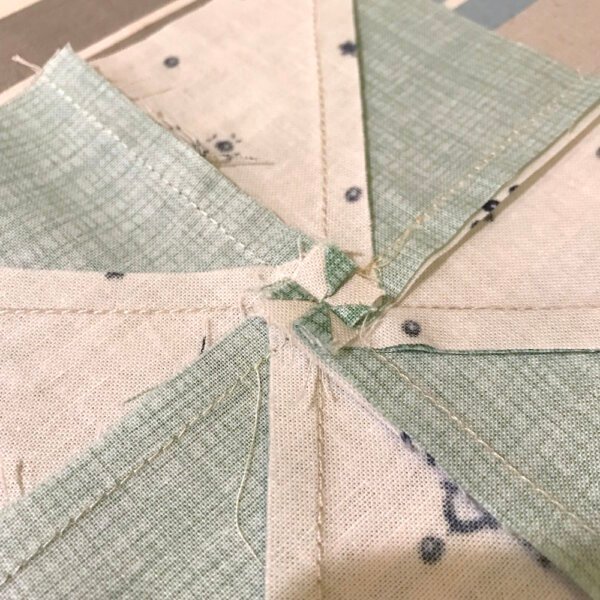
Step #3: Pressing for a Flat Pinwheel Block
Here’s the important part: Gently press the center of your pinwheel seam to open the seam up. This will push one side up and one side down.

Once you’ve got it how you want it, press. Press it really well! You’ll know you’re doing it right when you see a mini-pinwheel in the seam allowance, just like the image below.
Isn’t that super cool?! I’m sort of a geek about how the back of my quilt looks, and this really gets me going! Look at that teeny tiny pinwheel AND the seams are all going the same direction (#love). Not only is it cool and organized, but this is the best way to get a flat quilt top when sewing pinwheels. And it really does make a big difference in the end result—there’s nothing quite like a nice, flat quilt top.
Looking for more great tutorials?
Check out all of my awesome tutorials on the blog & make sure to sign up to receive updates when a new post or free pattern is added. Here’s a few to get you started…


Enjoy reading this post? To make sure you don’t miss a thing, follow me on Pinterest, Facebook, and Instagram and sign up for an email subscription to my blog.
Make sure to Pin this post for your next pinwheel quilt!
Wow! That’s impressive! I’m going to try it the next time I’m sewing a pinwheel!
It’s so satisfying! There’s nothing like a perfectly pressed block!
This is so cool!! I love making pinwheel!! Any pinwheel!! I never noticed the mini pinwheel on the back!! Thanks so much!! I have passed this on to my quilting friends!!
That’s great, Sam! It’s a fun little trick that really comes in handy!
Well, blow me down! Pity goodness, as Aunt Peggy would say; why didn’t I think of that!!!! What a clever idea! Thanks!
I’m glad you enjoyed it Maggie!
Wow! I just made four perfect pinwheels. Thanks for the great pointers. I am new to quilting piecing and these pin wheels made me feel rather proud!
That’s wonderful to hear Kim, I’m so glad!
Have done half squares before without giving much thought to details. Thank you for directing me to more careful ways! You set great standards. Thank you again.
Of course, Saratha, it’s all those little details that make for a great quilt!
Excellent. I really appreciate the close up photos of the demonstration. I am going to sign up for your blog. Thank you.
I’m glad you enjoyed it, Karen! I hope you love every blog post from here on out! 🙂
Thank you Rachel for this very timely post! I was joining flying geese into a square and that last seam always causes a dilemma. Which way should I press it, or should I press it open? What about that huge bump in the centre? With this method, the center is flat and all the seams go the way they should! Excellent! I’ll be sharing a link to this post to all my quilting friends.
Hi Linda,
I’m so glad to hear it! I want my blog to be as helpful as it can be for my readers. 🙂
Happy sewing!
Thanks for sharing that tip. I made a kaleidoscope quilt which had 8 pieces of fabric coming together in the centre. Maaan…I tried everything to get those suckers flat! Its the lumpiest quilt I’ve done yet…I wonder if your trick might have helped?
Next time I will try it.
Cheers.
Terry
Thank you for the downloads. I am looking forward to trying them. I have only been quilting for 7 years since I have retired. Love every moment I can get to the machine. I am at present doing a tumbling block quilt. Work in progress. Have just done a Dresden Plate hand done quilt which I put in my first show. Have done lots of children quilts. Regards Pat
You’re very welcome, Pat! I’m so glad you’ve found quilting post-retirement, it’s a wonderful hobby no matter where you’re at in life! 🙂 Happy sewing!
Thanks for the wonderful tutorial. I am currently making a flannel pinwheel quilt and did not like the way my first block was sitting at the overlap. I googled “how to” and found your tutorial. It was easy to follow and I am pleased to say the rest of my blocks are sitting perfectly with no bulk at the centre and a cute little pinwheel on the reverse. I think I just might unpick the original block and use your method…and I hate unpicking! Thanks Rachel
I’m so glad to hear it! You might only have to unpick the center- give it a try before you rip everything out. I avoid ripping as much as I can too 🙂
Either way, happy sewing!
I can’t believe how easily this fell into place and how easy it was to do!!! I thought i missed a step or something because I didn’t understand the presser step. Well, I slowly followed the steps and the last one, when I started to press it, it literally sat right into place. Thank you for sharing.
I’m so glad you liked it and gave it a try Charity! Happy sewing! 🙂
What! You mean I didn’t figure this out myself?! (Kidding … I just figured out how to do this on my last quilt. So cool. I had some help from a friend.)
That’s great- nothing like a quilty friend!
Do you find it necessary to trim the pinwheel block at the end of the above process? Thank you for the tutorial!!
Yes, you will need to at least check them, some might need trimming. I’m glad you like the tutorial 🙂 Happy sewing!
Thank you for your tutorial. I have a zig zag quilt top with 6 seams coming together in the block centers. I am going to un-sew the very centers and I think I can manuver a spiral to make it flat. Wish me luck! Thank you tho. Great tutorial!
Good luck! 🙂 Let me know how it works out!
Nesting and spinning seams is an amazing tool for piecing accuracy. Thank you for linking up with the festival!
You’re welcome! I’ve found so many of my readers love this post and thought I’d share it some more 🙂
Thank you for this tutorial. BUT….. what if I don’t have a “background fabric”? I am making pinwheels with 18 (!!!!) different turquoise fabrics. Light, med., and dark, some solid, some prints. How can I determine how to press these so I can get all the seams going in the same direction? Do you have a method for doing this AND maintaining sanity? I’d sure appreciate any suggestions you have!
Hi Kathy, no problem. If I understand correctly, there’s no consistency among the fabrics but there will be in each pinwheel. Is that correct? If so, just choose a “background” and call it that for each set you do. That way you can keep things in order and get your seams all pressed in the correct direction.
If you’re doing them REALLY randomly, then I would say as you piece your two HSTs to create 1/2 of the pinwheel, make sure that your seams are nesting into each other for both halves. Then as you piece the halves, make sure that the center seam nests as well. Once it’s all sewn together you’ll see that the seams are all going the same direction and you should get that perfect center!
I hope that was helpful. I’d love to see your finished quilt in the comments here when you’re done!
I have always loved this technique and it is great to see your detailed explanation. Congrats on the win on the Festival! It sure is fun to see who floats to the top!
Thanks Kathleen! It’s such a fun and satisfying little trick. And thanks! I can’t believe I won!
Hi Rachel. I am just starting a baby quilt that has pinwheels and did a sample block and found the bulk in the middle join. Have been searching different sites to find the best way to do them. I love the way you have explained the process but haven’t tried it yet. Just one question, (maybe a dumb one…)but, do you have to sew in the seam or does the pressing keep it in place. Just wondering if it stays in place after being washed?
Hi Tania,
Thanks for your question! You don’t need to do anything but press to keep the seams as shown. When you create your “quilt sandwich” the seams will be flat against the batting and the quilting will hold them in place.
I hope that helps!
Thanks so much Rachel. Maybe I should have made one before the query!! Just sewed one up now and perfect!!!
Thanks so much Rachel. Maybe I should have made one before the query!! Just sewed one up now and perfect!!!
Do you do a backstitch when you start the seam 1/4″ in? I guess this is the same idea as picking out the stitches in the seam allowance to allow the seams to spin? I worry about the seam opening up. Thoughts? Thanks!
I am the same way, Barbara! Technically, you don’t need to backstitch, but I at least like to do a small backstitch or use the knot function on my machine, I hope that helps!
It worked! I got the biggest kick out seeing that little mini pinwheel magically appear on the back of my block. As a beginning quilter, these kinds of “wins” really help me enjoy what can sometimes be a slow and frustrating learning curve. Thank you!
Glad to hear it, Cindy 🙂
Isn’t it just the best!?
Hello Rachel, Thank you for your tutorial on how to make flat pinwheels. The photos are very helpful. I have a question about pressing the seams. It seems in your previous tutorial the seam was press toward the green fabric. In this tutorial you say, “Press seams towards the background fabric, just like you did before.”. Perhaps I am missing something here but in the photos it appears to me that the seams are pressed toward the white background fabric. The photo shows how beautifully the seams all align in the same direction. Am I misinterpreting the directions or photos? Thank you for your help.
Thanks for your question Sharon!
You’re right, in the first tutorial, when creating the HST you’ll press away from the background fabric. But you caught a typo when I talked about it a second time in this post! I’ll be updating that in just a second 🙂
Thanks so much!
Is there any way to get a paper copy of your “How to get a Flat Pinwheel Block”? Download maybe? Will pay.
In 75… Memory shot :}}
Thanks for your question Fae! You’re welcome to save or print this tutorial for future reference! 🙂
I didn’t get any pictures underneath the written tutorial. The space indicates that there would have been visuals too. I would really like to learn this particular technique. Any suggestions would help. Thanks.
Thank you Joyce,
We are working to resolve this now- hopefully we will be back with images very shortly!
What a great tutorial, thanks! I use my scraps to make pinwheels, so will give this a go next time around.
Awesome! I’d love to hear about it!
I do not do quilting, but I tried to make a hat and was unable to neatly join the 8 seams. They were skew, overlapped and I got all sorts of horrible concoctions. I am hoping after reading this, I can do better next time. Thank you.
That’s a really interesting thought! I would love to hear how it goes for you next time around.
Happy sewing!
Thank you so much Rachel! I’m making a Gypsy Wife quilt and there are nine pinwheels. I made three of them and I wasn’t happy with how bumpy the centers were. Not any more! I undid them, applied your advice, and they are perfect now! Thanks again.
Great tutorial!
When connecting rows of pinwheel blocks, more pinwheels form. Should I be reducing bulk in these new pinwheel centers as well?
Great question Marilyn,
I do the center trick when joining rows as well, but I often have to twist the seam elsewhere to get it to work. This is where personal preference comes in! My seams all look great from the front, which is my priority, but everyone works a little differently.
I hope that helps – happy sewing!
I am a long-armer… I love this tutorial and I love my clients who know how to do this. I am always sad when my machine bumps around a center bump. (how would you say it?). I can dress up crooked seams. I can make simple quilts look fancy, but there is no way for me to quilt away bumpy centers…
Thanks so much Brenda! I always love getting feedback from longarmers on my patterns and tutorials. It makes such a big difference in the final project 🙂
That’s really helpful. I’ve just finished a HST quilt and didn’t do this, and was really thinking I’d never do another triangle quilt because of the way the seams didn’t align well and were so bumpy. I think I could tackle another one armed with this information. Thanks.
hi Rachel, what is the “knot function” on your machine? Never heard of that function before. Do all brands have that? I have an old Singer sewingmachine. I did not find the “knotting function” in the manual. Please explain. Thanks in advance!
Hi Marina,
Thanks for your questions. It’s a newer feature found on many BERNINA sewing machines. It takes the place of a backstitch and just stitches in place several times to “knot” the thread.
thank you for your answer.
Hello,
So glad I saved this. Thank you so much. I needed this technique.
Gayle